You are using an out of date browser. It may not display this or other websites correctly.
You should upgrade or use an alternative browser.
You should upgrade or use an alternative browser.
For anyone who's built their own boat....
- Thread starter KnottyBuoyz
- Start date
- Joined
- Mar 3, 2006
- RO Number
- 20406
- Messages
- 1,584
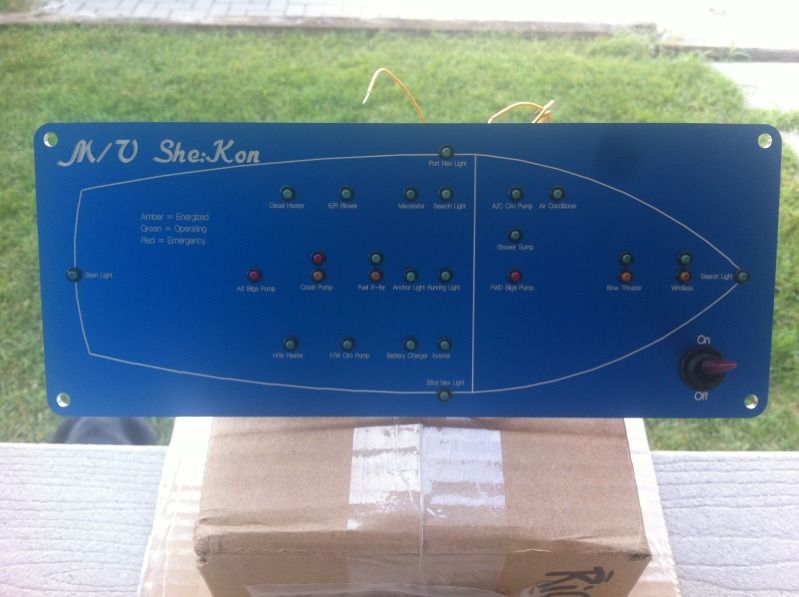
This is the "mimic panel" I designed with Front Panel Express. They give you the software to do the design and submit it to them and they cut it for you. This is the second panel I've had them do for the new boat! Not a big project but still pretty cool! ")
- Joined
- Mar 3, 2006
- RO Number
- 20406
- Messages
- 1,584
Got the new yacht all rigged for her maiden voyage. Was a lil' worried the Jeep couldn't pull this monstrosity!
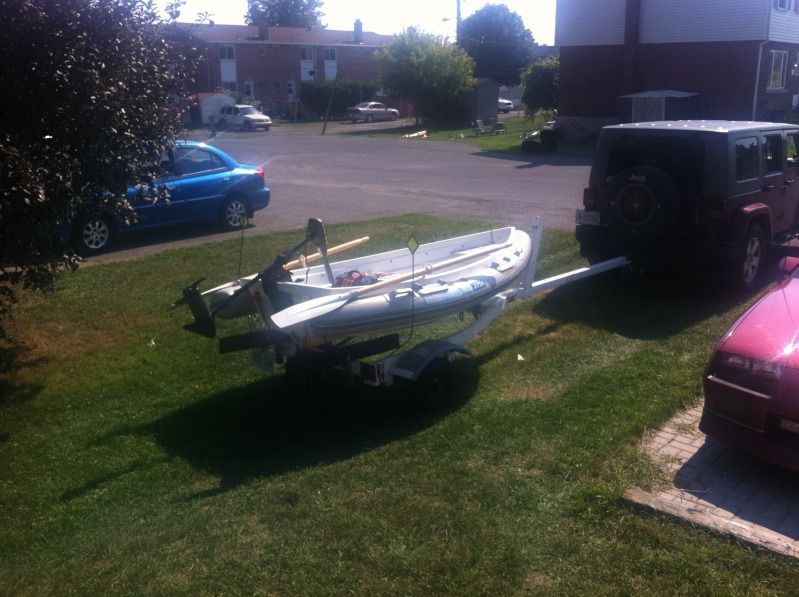
Here we are underway. The Admiral scanning for hazards! Look the other way dear!

Minn Kota 55lb thrust trolling motor pushed us along at a max 3.85 kts at full power. At half power we were doing 2.2-2.5 kts. Time to renew my fishing license methinks!
Here we are underway. The Admiral scanning for hazards! Look the other way dear!
Minn Kota 55lb thrust trolling motor pushed us along at a max 3.85 kts at full power. At half power we were doing 2.2-2.5 kts. Time to renew my fishing license methinks!
- Joined
- Mar 3, 2006
- RO Number
- 20406
- Messages
- 1,584
When it's too hot in the kitchen get the hell out! How hot was it in the boat shed today? This hot!

That's about $10 worth of epoxy that kicked off within 6 minutes at about 95 degs F! Grrrrrr!

This stuff gets hot lemme tell ya! I had to rip the glove off and toss the tray outside. It was smokin'! No **** sherlock!
I started out in the shed this morning about 8:30. It was already about 80 degs F in there but with the fans going full blast it was tolerable. I wanted to get the final layers of tape on the keel.
Working alone doing this type of job sucks. I had to resort to a lil' 3M Super 77 to keep the tape from blowing around and ending up in the dirt. I know it's not ideal but it's what I had to do.
Once I got the tape all laid out it was onto the epoxy. I knew I had to work quickly and resorted to the roller instead of the chip brush. Both are messy but the roller a little bit less so. I made it from the bow back a little farther than the tape in the lower section of the pic above. That's when I ran into problems with the epoxy kicking off too quickly. I had two paint trays in rotation because a little uncured epoxy will hasten the curing process. I'd leave one to drip out while using the other. I think I'll need to pick up a couple more trays! *sigh*
Oh well, get an early start on it again tomorrow and see if I can get the rest of the taping done. Then it's onto some really big fiberglass!
That's about $10 worth of epoxy that kicked off within 6 minutes at about 95 degs F! Grrrrrr!
This stuff gets hot lemme tell ya! I had to rip the glove off and toss the tray outside. It was smokin'! No **** sherlock!
I started out in the shed this morning about 8:30. It was already about 80 degs F in there but with the fans going full blast it was tolerable. I wanted to get the final layers of tape on the keel.
Working alone doing this type of job sucks. I had to resort to a lil' 3M Super 77 to keep the tape from blowing around and ending up in the dirt. I know it's not ideal but it's what I had to do.
Once I got the tape all laid out it was onto the epoxy. I knew I had to work quickly and resorted to the roller instead of the chip brush. Both are messy but the roller a little bit less so. I made it from the bow back a little farther than the tape in the lower section of the pic above. That's when I ran into problems with the epoxy kicking off too quickly. I had two paint trays in rotation because a little uncured epoxy will hasten the curing process. I'd leave one to drip out while using the other. I think I'll need to pick up a couple more trays! *sigh*
Oh well, get an early start on it again tomorrow and see if I can get the rest of the taping done. Then it's onto some really big fiberglass!
I've been following this thread but can't remember a couple of things. Are you using the slowest available hardener for the heat you're working in? Also, get an old cooler big enough for your paint tray and throw some ice in it. You can slow down the cure easily by chilling the epoxy a bit before applying -- and you can hold uncured epoxy in the tray for short periods by chilling it.
- Joined
- Mar 3, 2006
- RO Number
- 20406
- Messages
- 1,584
Hi Robert
I knew that! No room in the shed even for a small fridge. I'll figure something out. May just wait till the end of Sept when I retire to bother with it. Going to be freakin' hot again this week!
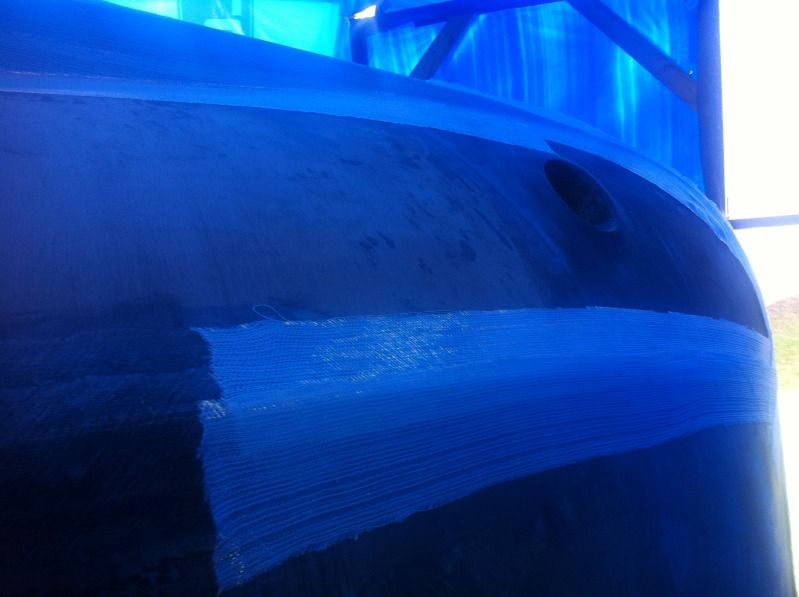
Having a problem with the taped joints I did. They all turned out like this.
Consulting with the product distributor and designer now. I may end up having to grind it all off anyways. Yet 'nuther costly error! :-(
I knew that!
No room in the shed even for a small fridge. I'll figure something out. May just wait till the end of Sept when I retire to bother with it. Going to be freakin' hot again this week!Having a problem with the taped joints I did. They all turned out like this.
Consulting with the product distributor and designer now. I may end up having to grind it all off anyways. Yet 'nuther costly error! :-(
- Joined
- Mar 3, 2006
- RO Number
- 20406
- Messages
- 1,584
This morning I've been thinking..... This is when Lori always says: "Uh oh!" [:-hspin]
Well I'm always thinking. I'm the idea guy! Straddling the line between genius and insanity I say!
I'm half thinking about revisiting the infusion process for some of this boat hull project. Gotta put some more thought into that. I'll eliminate a lot of issues but also adds some expense and a great potential for disaster! No risk, no reward, correct?
Anywho, this morning I tried filling the little voids left in the tape with straight epoxy. It immediately ran straight out. I think that was my problem. The epoxy just ran out leaving dry tape behind. The peelply should have helped mitigate this actually. So I decided to mix up a batch of "baby puke" (cause that's exactly what it looks like) which is epoxy thickened with micro baloons. It really does look like the stuff Daniel used to spit up all the time! :lol:

This did a better job and will require just a light sanding before the next layers go over top. There are a few larger voids that'll have to be ground out and repaired.
The tape would just not lay down on some sections. I'm suspecting I got a bad roll of tape. Either got wet or contaminated somehow. Anyhow, no biggie, I ordered another roll from Noah's so we're all set now.
The keel seams are all taped now. Just a few small parts on the very back of the keel to add some extra material for piece of mind.
Once this is all setup it's back to the sander to prep the hull for fiberglass! Thank gawd it's been a long haul with a bum knee and the heat. I'm really looking forward to getting the outside done and this thing flipped!
Time to go put my thinkin' cap on and maybe a power nappy!
Well I'm always thinking. I'm the idea guy! Straddling the line between genius and insanity I say!
I'm half thinking about revisiting the infusion process for some of this boat hull project. Gotta put some more thought into that. I'll eliminate a lot of issues but also adds some expense and a great potential for disaster! No risk, no reward, correct?
Anywho, this morning I tried filling the little voids left in the tape with straight epoxy. It immediately ran straight out. I think that was my problem. The epoxy just ran out leaving dry tape behind. The peelply should have helped mitigate this actually. So I decided to mix up a batch of "baby puke" (cause that's exactly what it looks like) which is epoxy thickened with micro baloons. It really does look like the stuff Daniel used to spit up all the time! :lol:
This did a better job and will require just a light sanding before the next layers go over top. There are a few larger voids that'll have to be ground out and repaired.
The tape would just not lay down on some sections. I'm suspecting I got a bad roll of tape. Either got wet or contaminated somehow. Anyhow, no biggie, I ordered another roll from Noah's so we're all set now.
The keel seams are all taped now. Just a few small parts on the very back of the keel to add some extra material for piece of mind.
Once this is all setup it's back to the sander to prep the hull for fiberglass! Thank gawd it's been a long haul with a bum knee and the heat. I'm really looking forward to getting the outside done and this thing flipped!
Time to go put my thinkin' cap on and maybe a power nappy!
- Joined
- May 12, 2009
- RO Number
- 31236
- Messages
- 322
Hey Rick, been watching this thread for months over here on the left coast. Don't know why it's taken me this long to delurk. Impressive project you're undertaking. I completely understand the lure of boat building and the adventure of it all. Can't say I've done it myself, but I can imagine nothing more satisfying than to take the helm of boat built by one's own hand. Looking forward to seeing her splash!
I worked for a semi-custom yacht builder for several years, and while I was there the vacuum infusion process was introduced. While there was an initial investment in a pump and other equipment, and there was always a lot of discarded supplies on every infused part, the production people found that they were able to build large parts (decks, partitions, command bridges, hard tops, etc) using significantly less resin. They got a stronger lighter part with no voids using up to 40% less resin. That represented a significant savings, and made for a substantially lighter -- and therefore more fuel efficient -- boat. You may find that your investment in equipment and supplies for infusing more than pays for itself in reduced resin costs, and in fuel savings from having a lighter boat. Another benefit that I'm sure you'll appreciate is that vacuum infusion is a sealed process; you don't need to wear a respirator or the whole HAZMAT outfit! Once you get it all set up, you just turn on the pump and monitor the resin flow as it wets out your part.
That's the way the guys at the boatyard did it in any event. Not sure if it's the same for the home builder.
All the best to you on your project!
quote:
I'm half thinking about revisiting the infusion process for some of this boat hull project.
I worked for a semi-custom yacht builder for several years, and while I was there the vacuum infusion process was introduced. While there was an initial investment in a pump and other equipment, and there was always a lot of discarded supplies on every infused part, the production people found that they were able to build large parts (decks, partitions, command bridges, hard tops, etc) using significantly less resin. They got a stronger lighter part with no voids using up to 40% less resin. That represented a significant savings, and made for a substantially lighter -- and therefore more fuel efficient -- boat. You may find that your investment in equipment and supplies for infusing more than pays for itself in reduced resin costs, and in fuel savings from having a lighter boat. Another benefit that I'm sure you'll appreciate is that vacuum infusion is a sealed process; you don't need to wear a respirator or the whole HAZMAT outfit! Once you get it all set up, you just turn on the pump and monitor the resin flow as it wets out your part.
That's the way the guys at the boatyard did it in any event. Not sure if it's the same for the home builder.
All the best to you on your project!
- Joined
- Mar 3, 2006
- RO Number
- 20406
- Messages
- 1,584
Thanks for looking in rapscallion. I appreciate the positive feedback. Helps keep the interest in the project alive!
I've tinkered with infusion on a few small projects. The lure of the "hightechyness" of it appeals to me. I like gadgets and fancy ways of doing things.
I taught myself infusion from some great resources on the Internet. Our first test was just two small pieces of fiberglass and carbon fiber. Just flat panels to see if it actually worked like they say it did.
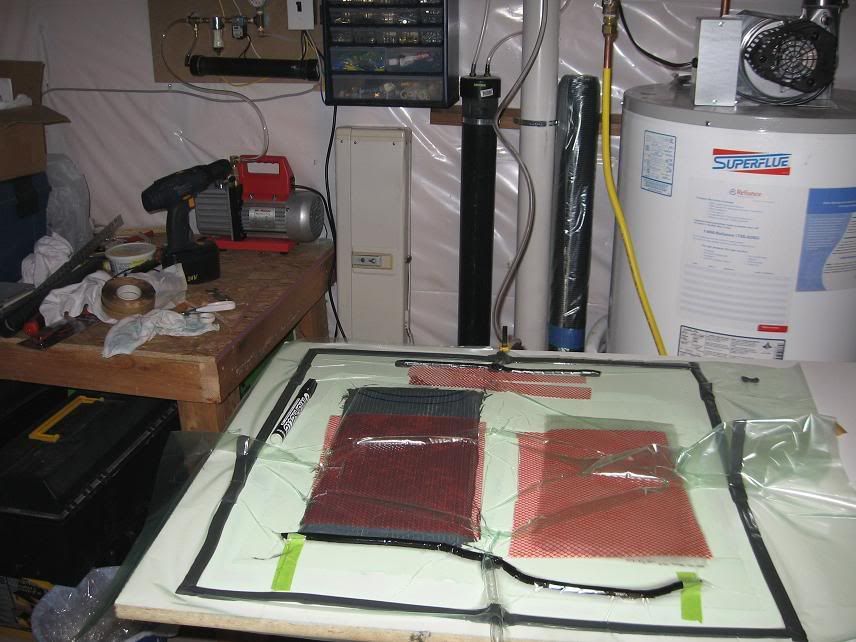
In the background you can see the resin trap and vacuum reservoir. I use a Robinair air conditioning pump. To automate the pump I followed directions from the joewoodworker.com web site for an automatic switch setup. That's mounted on the wall above the pump. It shuts the pump off when vacuum limit is reached and restarts it when vacuum drops. Pretty cool setup and you can leave the pump unattended.
These are the first two parts. Fully infused, no voids.
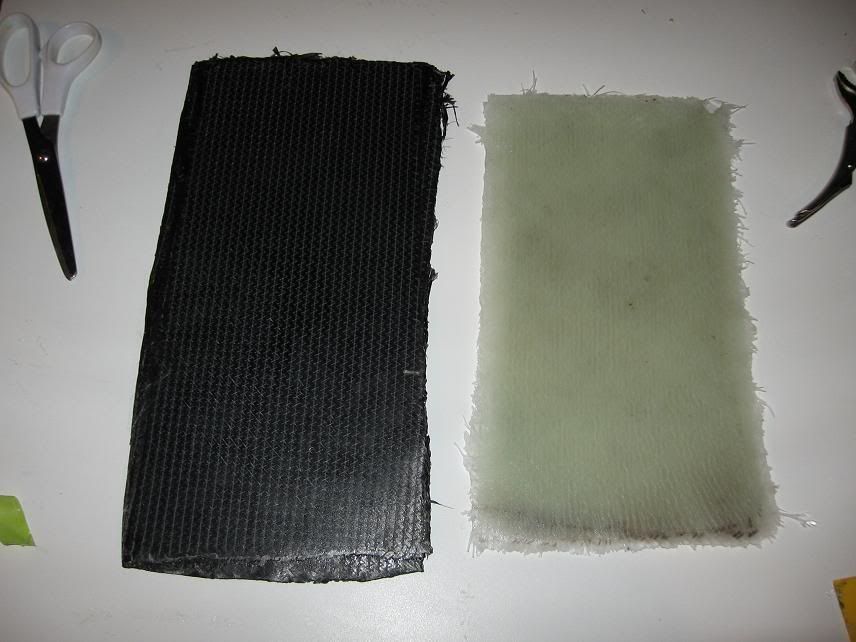
After those I went on and made a few other things. Foam cored cover for the sump pump etc. So I know a little about the process but scaling it up to a 31' boat hull is a little daunting. I think if I do do it it'll be on the inside of the hull. The outside will get done the conventional way with an extendible pole handle and roller and plenty of goop!
Thanks again for looking in.
I've tinkered with infusion on a few small projects. The lure of the "hightechyness" of it appeals to me. I like gadgets and fancy ways of doing things.
I taught myself infusion from some great resources on the Internet. Our first test was just two small pieces of fiberglass and carbon fiber. Just flat panels to see if it actually worked like they say it did.
In the background you can see the resin trap and vacuum reservoir. I use a Robinair air conditioning pump. To automate the pump I followed directions from the joewoodworker.com web site for an automatic switch setup. That's mounted on the wall above the pump. It shuts the pump off when vacuum limit is reached and restarts it when vacuum drops. Pretty cool setup and you can leave the pump unattended.
These are the first two parts. Fully infused, no voids.
After those I went on and made a few other things. Foam cored cover for the sump pump etc. So I know a little about the process but scaling it up to a 31' boat hull is a little daunting. I think if I do do it it'll be on the inside of the hull. The outside will get done the conventional way with an extendible pole handle and roller and plenty of goop!
Thanks again for looking in.
- Joined
- Aug 5, 2008
- RO Number
- 30499
- Messages
- 6,405
Rick I give you a lot of credit! I wouldn't even know were or how to start a project like this. I know I wouldn't have the ability to see it through. I have been watching since the start and I find myself anxious to see each of the steps you have completed. Keep up the good work I hope the rest goes quick and easy for you.
I can't wait to see the finished product
I can't wait to see the finished product
- Joined
- Mar 3, 2006
- RO Number
- 20406
- Messages
- 1,584
You make me blush Dave. I actually have no idea what I'm doing and make it all up as I go along!
My greatest fear is not finishing this thing. I'm terrible at finishing things. I've got a dozen projects around the house in various states of completion! I'll get to them all eventually I guess!
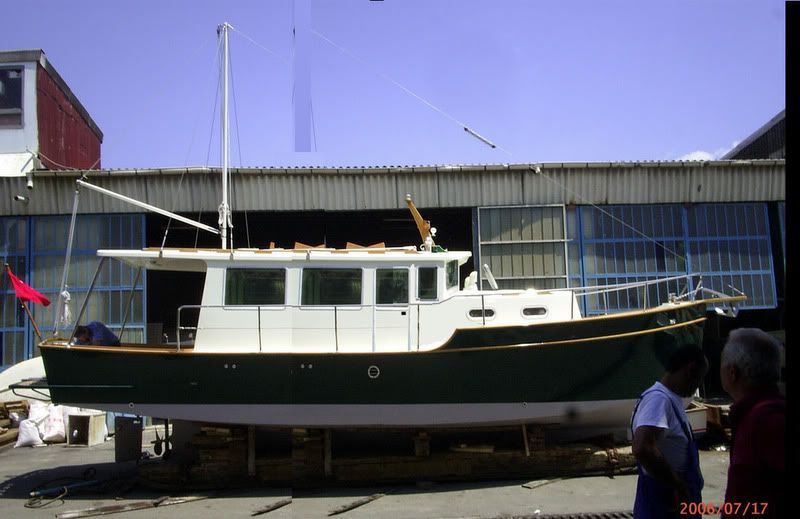
Anywho here's what it's going to look like when I'm done (if I ever get it done).
I have a few of these pinned up at various places around the house and shed. They keep reminding me of the goal. September 20th. will be my last day of work in the Coast Guard so I'll be turning my attention to the boat full time. It might speed up a little bit after that!
Thanks for the kind words and looking in on my project.
Standby....
My greatest fear is not finishing this thing. I'm terrible at finishing things. I've got a dozen projects around the house in various states of completion! I'll get to them all eventually I guess!
Anywho here's what it's going to look like when I'm done (if I ever get it done).
I have a few of these pinned up at various places around the house and shed. They keep reminding me of the goal. September 20th. will be my last day of work in the Coast Guard so I'll be turning my attention to the boat full time. It might speed up a little bit after that!
Thanks for the kind words and looking in on my project.
Standby....
- Joined
- Feb 8, 2011
- RO Number
- 32479
- Messages
- 363
In a word...Awesome!
My hat's off to you for sheer determination alone.
My hat's off to you for sheer determination alone.
- Joined
- Mar 3, 2006
- RO Number
- 20406
- Messages
- 1,584
I don't remember building in a skylight! [:-banghead]

Winds were gusting to 65 km/h this morning and ripped this section of the shrink wrap off the roof!
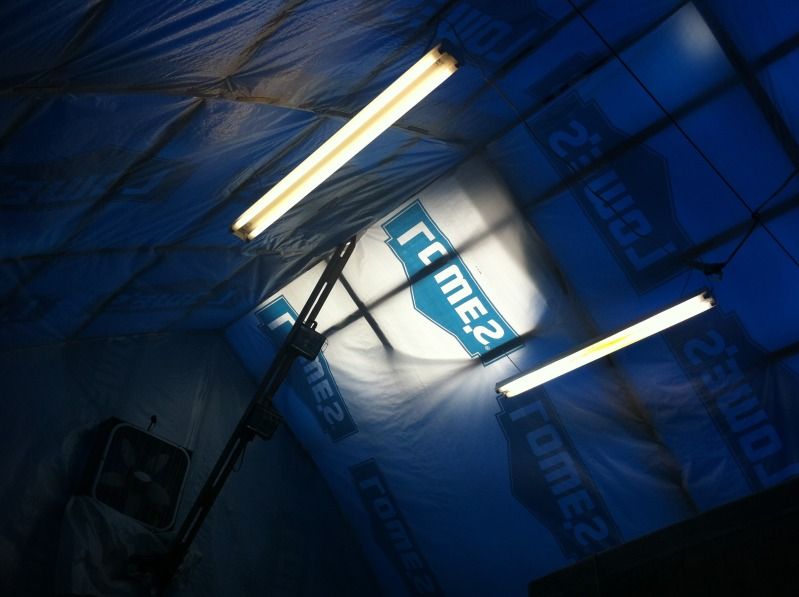
In hind sight I wish I had used something different to cover the shed. This will definitely be a PITA to fix. Gotta wait till the weather lets up though.
Winds were gusting to 65 km/h this morning and ripped this section of the shrink wrap off the roof!
In hind sight I wish I had used something different to cover the shed. This will definitely be a PITA to fix. Gotta wait till the weather lets up though.
- Joined
- Mar 3, 2006
- RO Number
- 20406
- Messages
- 1,584
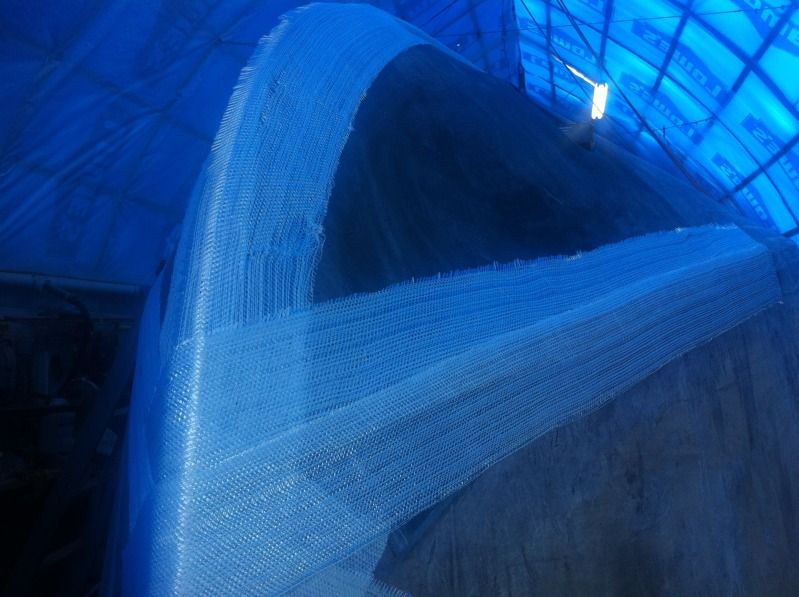
What does a 90 lb roll of fiberglass look like hovering in the air?
Just like this!
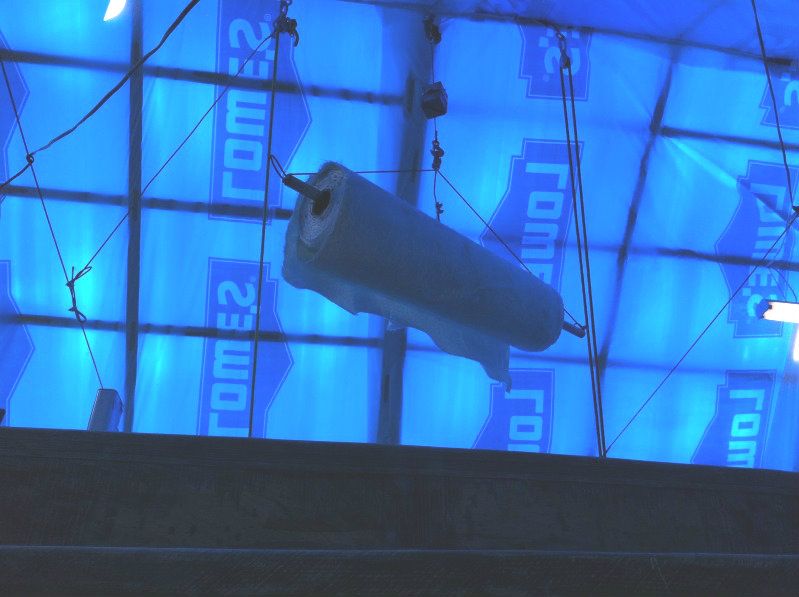
Seams are all sanded. Just need to wipe them down then will likely get glassing sometime this week. Just waiting for my buddy to arrive so we can fix the shed roof. Standby.
Just like this!
Seams are all sanded. Just need to wipe them down then will likely get glassing sometime this week. Just waiting for my buddy to arrive so we can fix the shed roof. Standby.
- Joined
- Jan 1, 2000
- RO Number
- 392
- Messages
- 41
Awesome build. Keep up the good work
- Joined
- Mar 3, 2006
- RO Number
- 20406
- Messages
- 1,584
Swallowing the anchor. After 32 yrs in the Coast Guard this is my last day! The second happiest day of a sailor's life, walking down the gangway for the last time. It's been an adventure. Now it's time for the real fun to begin!
quote:
Originally posted by KnottyBuoyz
Swallowing the anchor. After 32 yrs in the Coast Guard this is my last day! The second happiest day of a sailor's life, walking down the gangway for the last time. It's been an adventure. Now it's time for the real fun to begin!
+1 and Congratulations!