Rebuilding Wet Transom

MikeeH

Active member
Member
Joined
Oct 5, 2001
RO Number
6342
Messages
2,297
Yeah, as I suspected, the wood core of the transom on our 1988 Wellcraft bowrider is mush. Long story short, previous owned rack stored the boat long term at an outdoor facility and hadn't pulled the garboard plug. Lots of evidence of this beyond the transom problem. I suspected the problem existed two seasons ago when I installed a new FF/GPS and noted dry rot where the sender is mounted.

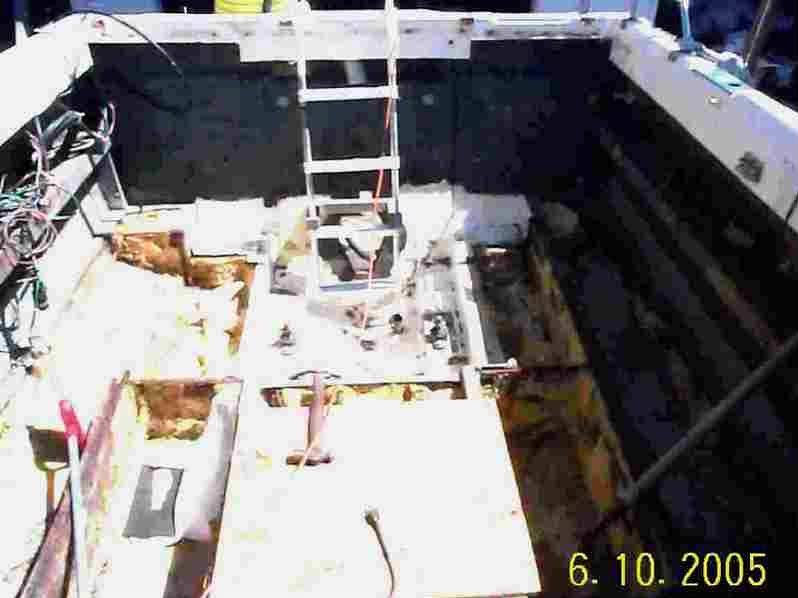
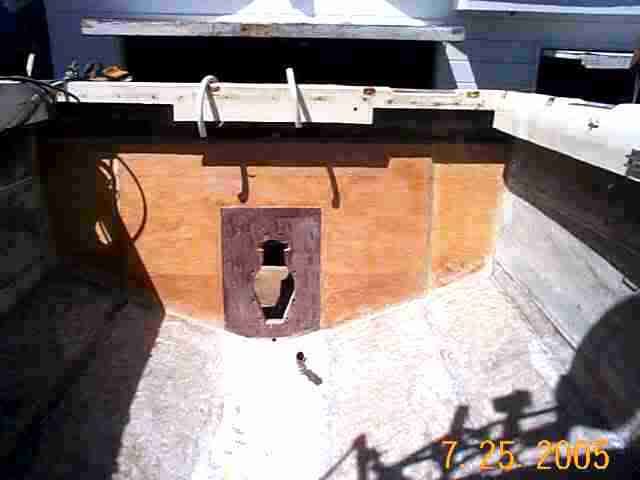
I hauled the boat in September before my shoulder surgery, removed the outdrive, gimbal housing, engine, hydraulics, etc, and cleaned up the bilge, stuck it in the garage and let it sit until I recovered from the surgery enough that I could start cutting away the transom inside the bilge. Found the entire plywood core of the transom rotted as well as portions of both stringers where they meet the transom. This is going to be a job and one that probably wouldn't be worth tackling if I was retired with more time available than money. Wish me luck!
 
Good luck, Mike. Nice to have you back.
 
Mike, I think I'd look at Seacast, this webpage http://www.transomrepair.net/. I don't think it's any coincidence that the boat they repair in the illustrations is a ...Wellcraft... Ours (a V20 Outboard, it looks like they're doing an 18-fish) needed transom work and I was ready to do it with Seacast when we got out of that boat entirely. Being an outboard, I would have been able to access the transom core from the top. Since it was a three-piece boat, I would have been able to pour the Seacast using the outer transom and the inner liner as my form. The plan centered on getting a cheap electric chainsaw and replacing chains destroyed by any metal fasteners in the lamination till the core was all gone. If your I/O transom isn't a hard liner, you should be able to remove the original coating, then the rotted plywood, and construct a form for the pour. BE SURE the form is secured solidly, so the weight of the Seacast cannot move or distort it, even if you have to glass some wooden blocks inside the hull.
EDIT: I see they're now working on a '68 Mako. When I first looked at it, you could see the tan hull color and the "Wellcraft" logo.
 
I was thinking of using something like this on our foredeck after opening some holes. I am glad I rethought it because it would have been difficult to get it around all of the crud. The only way I could do the foredeck was to peel the thin bottom laminate off and remove what was left from the top laminate.
A transom is much easier once you get all of the rotten wood out. There are a gillion youtube videos of Seacast repairs.
 
I checked into Sea Cast even before coming to BE. Got free samples and everything. The two down sides...it's heavy!!!. Second, you need access to the top of the transom. What that comes down to is, not all boats have coring that go from the bottom to the top. It's hard to get in there to do the work. I left that boat alone.

Another problem I unfortunately discovered, All my stringers and bulkheads were water logged and rotten.

You gotta really love your boat to go through a complete refubishing as you get into it.

Do test holes. I like to use at least 1/4" bits because it's easier to completely fill a large hole than a small one. A small hole will just get capped and trap mold and rot culture/mycellium within.
 
I had looked into Seacast but decided against it because it seemed a bit complicated to use that process on an I/O and its expensive! I've already cut away the transom from the inside and have all of the rotted plywood out. There is a portion of the wood close to the top of the transom on either side of the I/O cutout that is still solid so I'll need to work at getting that out as well as scraping or grinding the wood and epoxy residue off of the remaining inside of the fiberglass outer transom shell. After that I'll make a pattern for the new wood core (two layers of 1/2" inch marine plywood) and separately encapsulate each those layers. Then the first layer will get attached to the inside of remaining fiberglass transom using epoxy paste and the second layer then attached to the first again using epoxy paste. Then rebuild and encapsulate new stringer pieces and attach them with the epoxy paste, Finally, glass the entire new work with 8 ounce glass rove.

Yeah, its a bunch of work, some of it stinky glass work, but what the hell. I'm only limited by money and imagination.
 
Think fein tool or multi tool. It has been a God send to my efforts so far. You will sacrifice one of the fiberglass laminates but in the interest of a good job one has to go completely IMHO. I would pull all of the transom wood out.
 
Do you have a merc I/O? Look around,there's a certain thickness needed for the transom so the inner and outer transom assemblies mate.There's also a certain taper. I used two 3/4" plywood. searay don't all have plywood going to the top of the transom.Mine also didn't have a full two layers of plywood over the whole transom. I had to remove some good wood too. It's the nastiest job you'll face. Believe it or not, after a few days, the fiberglass won't bother you so much as in the beginning. I'll stick up some of my old pictures.

This is a pix of all the wood removed from the transom.

Deckreplacement010.jpg


Here you can see that the plywood doesn't completely cover the transom. And,in order to get a full, one piece of plywood covering the full width, the side shelf/wood had to be removed.

Deckreplacement014.jpg


This is a pix of the inner hull cleaned out and the dark wood in the middle of the transom which is a shim plate, tappered to specs and added to bring the transom to thickness specs.

Deckreplacement015.jpg
 
Charlie, exactly what I have. Yes, 3/4 inch, not 1/2" as I said before. I did see the taper to accommodate the steering control and my wood was doubled at the area of the O/D as yours but a larger section.

Boatbum, I've been using my multi tool almost exclusively on this job to remove the transom and sections of the stringers. I have several new scraper attachments just waiting to attack the leftover wood and resin.

Nasty, nasty job but when its done I'll know this boat better than I know my kids.
 
The epoxy in between the balsa and deck was the worst to remove. That stuff can dull the metal cutting blades.

Some have said to soak the new wood in CPES prior to installation. http://www.smithandcompany.org/CPES/ I do not know how this affects the bond of wood to glass but if there is any blush I think that can be removed with soap and water and a little light sanding.
 
If you want to use CPES you would have to be doing the transom in epoxy, because CPES is a thinned epoxy product. I don't know that a polyester resin would bond well to wood treated with CPES. Epoxy definitely does (used it myself in a few projects).
 
CPES is way too expensive to use on a big job like this.You can thin epoxy 5% or wait for a warm day and apply it straight and let it soak in before applying thickened epoxy.

Go to Tap Plastic for your epoxy. I've been advising Tap Plastic as long as I've been here. I've been using Tap Plastic Epoxy over 20 years. Tap plastic Marine Epoxy has very little 'Blush' and doesn't need washing off prior to second coat.Tap Plastic has been around twice as long as Wests products. Maybe 3 times. They are the established experts on epoxy. The employees aren't all that knowledgeable but their pamphlets tell you what you need to know. Their Epoxy is also measured in full gallons or pints, not the 2 to 1 pre mixture you pay for with Wests. That makes it a lot cheaper.
 
Great info on Tap. Next time for me I guess!

So what kind of thickeners are you using. Thickening epoxy makes working on something like this much easier and a path to a better job IMHO. You can trowel it into voids, use a notched trowel to spread it on the wood before you press it into place etc..

I have been using West 406 Silica but now I find the 403 easier to work with.

I have also been using cardboard to make templates that I transfer onto the core material I am using.
 
Yup, Cardboard for templates is the easiest. You can also transfer the cardboard template to plywood template to get a more accurate alignment for mounting holes.

I use fumed silica in the 5 lb bag. Got any idea how big a bag that is?...but cheaper on a big job. Transom alone isn't worth it.

Large voids that need filling, you can use saw-dust. It will never thicken but it will add bulk, then thicken with your thickener.

In case anyone wants to try this, attaching the first layer of plywood to the outer fiberglass skin, drill 3/16" holes in the transom skin. screw in screws to draw the plywood against the outer skin. Don't tighten the screws too much. You don't want to squeeze out all the thickened epoxy but enuff to show that the epoxy has filled any voids. Tighten the screws in a pattern from the center and work your way outward.

And as far as drilling holes in the transom, I had over 100 holes left from the many attachments over the years (since 1978) so I didn't need to drill too many holes. Just enuff to establish a pattern to pull the plywood and fiberglass together evenly, just like torquing heads down.
 
Today I had goo dripping down all over me. When they laid the balsa down on the top side they had glue/filler voids all over the place. So I troweled in thickened epoxy and then pushed the coosa up into it with thickened epoxy spread with a 1/4 inch notch. That chit was oozing out all around the edges.
I was able to control the squirt and capture it all before it fell down on me. It's going to be better with the second layer of coosa since I have a flat surface to lay into and will not be concerned about voids as much.

I know what the West 403 feels like so 5 lbs would probably cover a foot ball field :)
 
Should Mikeee consider using Coosa like Boatbum's using on his deck repair? Looks like it could make for a wood-free repair.
 
A cubic foot of Bluewater 26 weighs in at 26 pounds. That is 1728 cubic inches or 12x12x12. I found a 1" thick 4'x8' sheet of marine plywood weighs in at 76 pounds. That sheet is 48*96*1 or, 4608 cubic inches. So one cubic foot of marine plywood is about 28 pounds.

http://www.boulterplywood.com/MarinePlywood_4.htm

http://coosacomposites.com/products/2014-05-09-02-43-07/bluewater-panels

Coosa Composites does list BW26 as transom material. I would however, research how much of a glass skin on each side is required before going that route.
Regardless I would glass over all transom openings like the i/o opening.
 
I was planning on 3/4" marine plywood, epoxy encapsulated, double thickness for about 30" in the area of the O/D just as it was originally. By the time I add the 1/4" of existing exterior transom fiberglass and the epoxy paste between the plywood sheets as well as the plywood and the exterior transom and then the glass over the interior I figure I'll be at the necessary 2" thickness. I was going to cut the keyhole in the plywood for the O/D before I encapsulated it/ Is that a bad idea??? In any part my plan a bad idea??
 
The searay assemblers actually used a circular saw to cut out the key hole for the drive. Maybe you can imagine the long kerf cut into the transom plywood. They did not do an accurate job at all. I made my own template and aligned the template to the holes that were drilled thru the plywood. Use hole saws to drill out large areas of the keyhole. Then make cuts, with your saber saw, from the holes up to your template tracings. Finish up with saber saw.
 
Back
Top